Particles and Emitters
Last Updated: December 11, 2002
Overview
This document provides an overview of the Ghost Particle System. It should be used with the document title “Client Side Commands” to get the full list of functionality.
The functionality of Ghost resides in the client side game DLL (cgame DLL) and particle systems are defined in the client commands and init sections of TIKI files. Every Ghost system is defined in a TIKI file. In some cases the model of the TIKI file is hidden and not used, so we just get a pure particle system from the TIKI with no animations.
The nimation alias system can be used to define different particle systems in 1 TIKI file. For example: blah.tik can have 3 different client side animations: smoke, fire, blaze. These 3 animations can have different commands associated with them which will be executed on the client when its frame is played.
Example
Here’s an example of a animation block in the crossbow.tik model. We will be analyzing the client commands that are in the “fire” animation. The lines are numbered for reference and is not included in the TIKI file.
1.	animations
2.	{
3.	idle idle.skc
4.	fire fire.skc
5.	{
6.	server
	   a.	{
	   b.	first shoot
	   c.	}
7.	client
	   a.	{
	   b.	first sound $xbowdir$/alt4.wav 1
	   c.	2 tagspawn tag_barrel
	   d.	(
	   e.	count 5
	   f.	model crossbow_exhaust.spr
	   g.	life 1.00
	   h.	accel 0.00 0.00 50.00
	   i.	scalerate -0.01
	   j.	radius 5.00
	   k.	randvel crandom 10.00 crandom 5.00 crandom 20.00
	   l.	scalemin 0.15
	   m.	scalemax 0.50
	   n.	sphere
	   o.	fade
	   p.	)
	   q.	1 sound $xbowdir$/charge1a.wav 2 .5
	   r.	}
8.	}
9.	}
Line 4 is the beginning of a new animation. The alias for the animation is ‘fire’ and the animation file is ‘fire.skc’. Line 5 is the begin block of the animation commands. Line 6a-c define the server commands that will be executed when the frame is played.
Line 7 is the beginning of the client commands section. Line 7b denotes a sound effect that will be played on the first frame. 7c is the command that defines a particle system to be spawned on the 2nd frame of the animation. The tagspawn command is used to spawn particles (or tempmodels) from a specified location. The ‘(‘ on line 7d denotes the beginning of a block of ‘modifiers’ and ‘properties’ that the particle system will have.
Since this particle system is created on a specific frame of animation, it is called a “Spawned Particle System.” There are other particle systems called “Emitters” that wll be discussed below.
The tagspawn command takes 1 parameter which is the name of the tag that the origin of the particle system starts at. In this example tag_barrel is used (it’s the end of the crossbow). The next set of ‘modifiers’ can be placed in any order after the opening ‘(‘. Each command will modify the particle system in a different way. Combining these modifiers in different ways can lead to an unlimited method of creating special effects.
The first parameter is ‘count.’ This is the number of particles that will be spawned in this system. The second command is ‘model’ which lets the system know which model the particle system should be made from. In the example it’s crossbow_exhaust.spr. This is a sprite model which will be talked about later. The model can also be another TIKI file. Line 7g has the ‘life’ command. This is the amount of time (in seconds) each spawned particle will live. When a particle’s life runs out, it is removed from the system. The next command is ‘accel’ which is short for acceleration. This defines the acceleration of the particle. In this case it’s 50 units in the Upward Z direction. Accel is always relative to the world’s coordinate system and is independent of the parent model’s orientation.
The rest of the commands are outlined in the “Client Side Commands” document.
As you may be able to tell, this particle system defines a 5 puffs of smoke that will appear at the barrel of the gun and slowly rise upward for 1 second. The ‘randvel’ command gives them a slight variation in velocity when they are spawned so they spread apart in a natural way. The ‘fade’ command will allow them to fade out over their life time. This gives a nice effect of smoke dissipating away in the game.
Emitters
As mentioned above “Spawned Particle Systems” are associated with animations. Basically they are used to create effects that happen on a certain frame of an animation. Emitters are an entirely different system. They are particle emittters that never “shut off” unless you tell them to. Instead of a ‘count’ command they use a ‘spawnrate’ command. This is used to set the rate at which the emitter will emit particles
Since emitters are not tied to animations (although they may be controlled by them – see below) they are defined in the Init section of the TIKI file. Here’s an example of an emitter:
a.	init
b.	   {
c.	   client
d.	      {
e.	      tagemitter tag_weldsparks sparks
a.	        (
b.	        model weldsparks.spr
c.	        spawnrate 150
d.	        velocity 1
e.	        randvel crandom 1 crandom 1 crandom 1
f.	        scale .02
g.	        life 1.5
h.	        offset random 1 random 1 random 1
i.	        )
j.	      }
k.	   }
It’s similar to the Spawned Particle system above, but a little different. The command is called tagemitter and it takes 2 parameters. The first parameter is the tag name. This is the same as the tag name that is used in the spawned system above. The second parameter is the name of the emitter. The name is used to control the emitter in an animation.
Another difference in this emitter is the ‘spawnrate’ command. This is used to control the number of particles per second that are emitted in this system. This ‘sparks’ emitter will spawn 150 particles a second!
Most of the other commands are identical to the spawned system and will effect the system the same way. You may also have more than 1 emitter in the init section. This allows you to combine systems in one model file.
Controlling Emitters
To control an emitter you can use the ‘emitteron’ and ‘emitteroff’ commands in an animation. Here’s an example:
animations
{
client
{
turn_on idle.skc
   {
   client
      {
      emitteron sparks
      }
   }
turn_off idle.skc
   {
   client
      {
      emitteroff sparks
      }
   }
If you wanted to make this emitter turn on, use the level’s script file to play the ‘turn_on’ animation. To turn off the emitter simply play the ‘turn_off’ animation. This model doesn’t really have an animation, it just uses a dummy model with the idle.skc animation. Although you can have emitters on models with animation.
Sprites
Sprites are derived from shaders. To make a particle system use a sprite, set the model to the name of the shader appended with a .spr (E.g. weldsparks.spr). This will render a sprite with the specified shader.
The default size of the sprite will be equal to the size of the base texturemap. but these can be modified with the ‘spritescale’ shader command. The ‘spritegen’ shader command is used to create the type of sprite to display (parallel, parallel_oriented, oriented, and parallel_upright).
Developing Particle Systems
Particle systems can be created using an in game menu called “Emitter”. This menu allows the developer to interactively adjust the parameters of a particle system and then save them out for later use in the game.
To bring up this menu, it is advised that you bind a key to it. To bind it to the F1 key, issue the following command: bind f1 pushmenu emitter
Fundamentally there are two different types of particle systems, emitters and spawns. Emitters are persistant and are activated and deactivated by command. Spawners are one shot emissions that take place at key events. Generally models use spawners more often than emitters.
The testemitter menu does not cover all of the available commands that can be used – refer to the Client Side Commands.doc for the full list of commands that may be applied to emitters.
The first step in creating an emitter or spawner is to place the emitter on the ground in front of you. This can be done by pressing the “Place Emitter” button on the Emitter menu. This will create a default emitter out in front of the camera. You can now adjust the parameters of the emitter using the ‘emitter’ menu.
Here’s a screenshot of what the menu looks like:
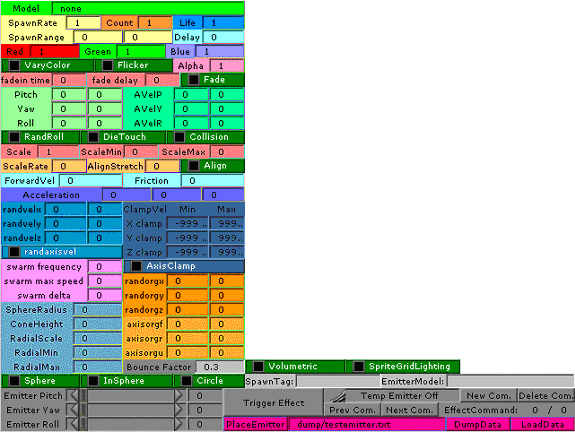
This menu allows you to modify some of the properties of emitters to test out different values. The first thing you should do is set the model to a valid value. The test emitter will update automatically as you type into the menu, so you may see some error messages while updating the values. Here’s a quick rundown of what the buttons and sliders change. All of the commands are in the document
- model – The model that the emitter will emit.
- spawnrate – The rate at which the emitter emits (this is number of models per second). This overrides any value set in the “count” field.
- Count – How many models to emit at one time. This is only valid for non-spawnrate emitters, like spawners.
- life – The amount of time in seconds the emitted model will live.
- Spawnrange – the minimum and maximum distance in which models will be spawned. This allows you to control the culling distance of the spawned models.
- Delay – how long to delay before starting to spawn. Used in multi-stacked emitters on the same model, triggered from the same animation.
- Red, Green, Blue – the color of the emitted particles/models. In order for this to work, the shader parameters of the emitted particles/models must support it properly.
- Varycolor – randomly perturb the color between 80% and 100% of its set value.
- Flicker – randomly modulate the visibility of the emitted model. Think of a firefly.
- alpha – The alpha of the emitted model. In order for this to work, the shader parameters of the emitted particles/models must support it properly.
- Fadein time – how long it should take to fade in the emitted model
- Fade delay – how long to wait before starting to fade out the model
- Fade – whether or not to fade out the model. The timing of the model is based off of life and Fade delay.
- Pitch, Yaw, Roll – Set the angles of the emitted models. The first column represents the base values. The second column is the offset. The final value will be a random value between [base] and [base + offset]. In order to specify a range between (-10) and (10), a base of -10 would be specified with an offset of 20. To specify a range between 20 and 60, a base of 20 would be specified with an offset of 60.
- AvelP, AVelY, AvelR – Set the angular velocity of the emitted models. The first column represents the base values. The second column is the offset. The final value will be a random value between [base] and [base + offset].
- RandRoll – give the emitted model a random roll. This is obsolete considering you have perfect control over the Roll from above.
- Die Touch – When collision is on and the emitted model touches something, kill it.
- Collision – Perform collision on each emitted model. NOTE: This can be expensive.
- scale – The scale of the emitted model.
- scalemin / scalemax – The min/max scale of the model. The scale will be randomized between the 2 specified values
- scalerate – This is the rate at which the model will scale in size. If you specify a negative number the model will shrink.
- Alignstretch – align the model along the path of movement and stretch it in that direction based on its current speed and the value of this scalar.
- Align – align the model along the path of movement.
- forwardvel – This will be the forward velocity of the emitted models in the direction of the orientation of the parent model.
- pitch / yaw / roll – Sets the angles of the emitted models. The 3 items to the left of the sliders is No,Cr,and Ra. This stands for No Random, Crandom, and Random. The No means that no randomness will be applied to the emitted model. Cr means that the angles will be randomized between –value and +value. Ra means that the angle will be randomized between 0 and +value.
- randvelx / randvely / randvelz – Applies a velocity to the emitted model. The No,Cr, and Ra are applied the same as mentioned above. These velocities are applied to the world orientation. For example: the setting randvelz to 100 means that the emitter will have 100 velocity in the up direction with respect to the world
- randorgx / randorgy / randorgz – applies an origin offset from the normal origin of the spawned entity. This is relative to the world. If you want to set an offset that is relative to the model, use the command: ‘offsetalongaxis.’
- acceleration – This is the vector specifying the direction that the emitted models will accelerate. This is relative to the world axis.
- sphereradius – This is used to spawn models in a sphere around the point of origin. This radius specifies how far from the origin the model will spawn.
- fade / flicker / randroll / sphere / insphere / align – These flags are used to set some of the effects on the spawned models.
- dumpemitter – This allows the user to dump out the current state of the testemitter to get the commands. This allows you to cut and paste the commands directly into a TIKI file.